Author: Will Burke

  • Repotting Houseplants in Austin: When to Do It, What to Use, What to Avoid

    Repotting Houseplants in Austin: When to Do It, What to Use, What to Avoid

    Every spring around the first warm weekend, I get the same wave of texts. Someone’s Monstera has roots curling out the bottom of the pot, or their fiddle leaf has tipped over twice this week, and they want to know if it’s time to repot. The answer is almost always yes — and the timing matters more in Austin than it does almost anywhere else.

    Repotting in Central Texas isn’t just “find a bigger pot, add dirt, water it.” Do it wrong here and your plant goes into transplant shock right as the summer heat ramps up, and by July you’re looking at a sad, crispy version of what used to be your favorite plant. After 25+ years moving plants in and out of Austin homes, here’s how I think about it.

    When to Repot in Austin

    The window is shorter here than people realize. The right time is early to mid-spring — late February through mid-April — once nighttime lows are reliably above 50°F and before the daytime highs start hitting 90. That gives the plant six to ten weeks of mild conditions to put out new roots and recover before the brutal part of summer kicks in.

    Late spring repotting (May, early June) still works for most plants, but you’re racing the heat. Anything after mid-June, I tell people to wait. Repotting in August in Austin is the single worst decision you can make for a struggling plant — the combination of root disturbance and 100°F heat will set the plant back six months. Even tough plants like pothos and snake plants slow down dramatically in summer here, so the recovery window just isn’t there.

    Fall repotting can work in a pinch — late September through October, once the worst heat breaks — but spring is the right answer for 90% of houseplants in Austin.

    How to Tell If Your Plant Actually Needs It

    People repot too often. The plant doesn’t want more space — most houseplants like being a little root-bound. The signs that it actually needs a new pot are pretty specific:

    Roots are growing out of the drainage hole and circling under the pot. Water runs straight through the soil without absorbing — that means the rootball is so dense there’s no soil left to hold moisture. The plant tips over because it’s top-heavy. You can lift the plant out and see a solid wall of white roots wrapped around the rootball with almost no visible soil. Any of those, it’s time.

    What’s not a reason to repot: the pot looks small. The plant grew a few inches. You bought a prettier pot. Plants you repot for aesthetic reasons usually punish you for it.

    What Soil to Use in Austin (And What to Skip)

    This is where Austin gets tricky. Most bagged potting mixes are designed for “average” conditions — moderate humidity, average water hardness, indoor stability. We don’t have any of that. Our AC runs hard and dries soil out fast, our water is loaded with minerals, and many of the cheap potting mixes sold at Austin big box stores are heavy on coconut coir, which holds water in a way that’s great for greenhouses and terrible for AC-dried indoor air.

    For most houseplants, I use a mix of high-quality indoor potting soil (FoxFarm Ocean Forest or Espoma Organic, both available at Barton Springs Nursery and The Great Outdoors) with about 25% perlite added for drainage. For drought-tolerant plants — snake plants, ZZ plants, succulents, jade — I use a cactus mix with another shot of perlite for good measure.

    Three things to avoid in Austin specifically: don’t use cheap coir-heavy potting mixes that stay soggy. Don’t use soil from your yard, even if you’ve got a Hill Country property with great-looking dirt — that soil is loaded with limestone and runs alkaline, which is wrong for almost every houseplant. And don’t reuse old potting soil from a plant that struggled or died; you don’t know what’s in it.

    Pot Size Matters More Than People Think

    The biggest mistake I see is people going up two or three sizes when they repot. They think they’re giving the plant room to grow. What actually happens is the rootball is now surrounded by soil with no roots in it, and that soil stays wet for weeks because there’s nothing pulling water out of it. The roots rot, the plant fails, and the owner blames the plant.

    Go up one pot size — usually a 2-inch increase in diameter. A 6-inch pot goes to an 8-inch pot. An 8-inch goes to a 10. That’s it. The plant will grow into it within a season and you’ll repot again in a couple of years.

    And as I mentioned in my hard water guide, terracotta is the right material for most Austin homes. The unglazed clay wicks moisture out, which counters our AC-dried air and makes overwatering much harder. Use a saucer underneath it and dump any standing water after 20 minutes.

    The Actual Repotting Process

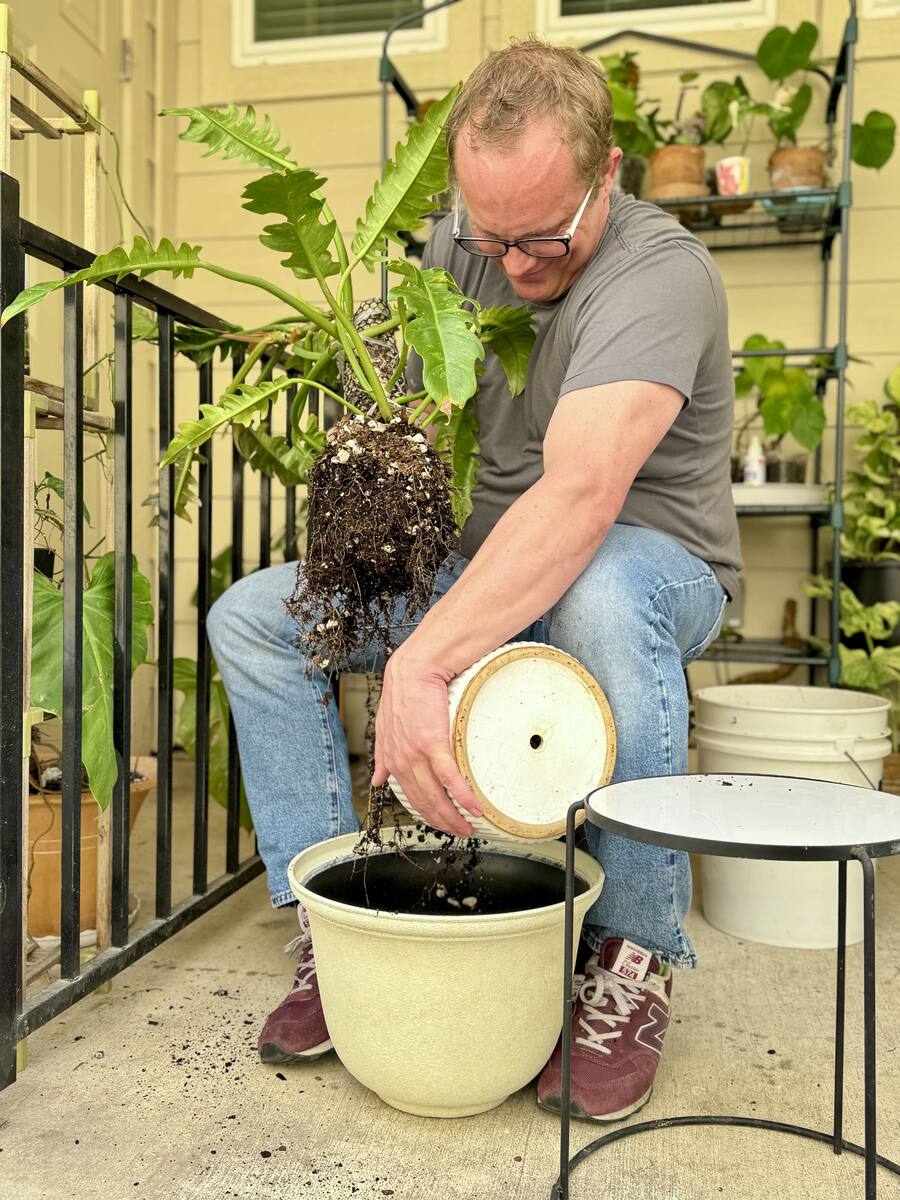
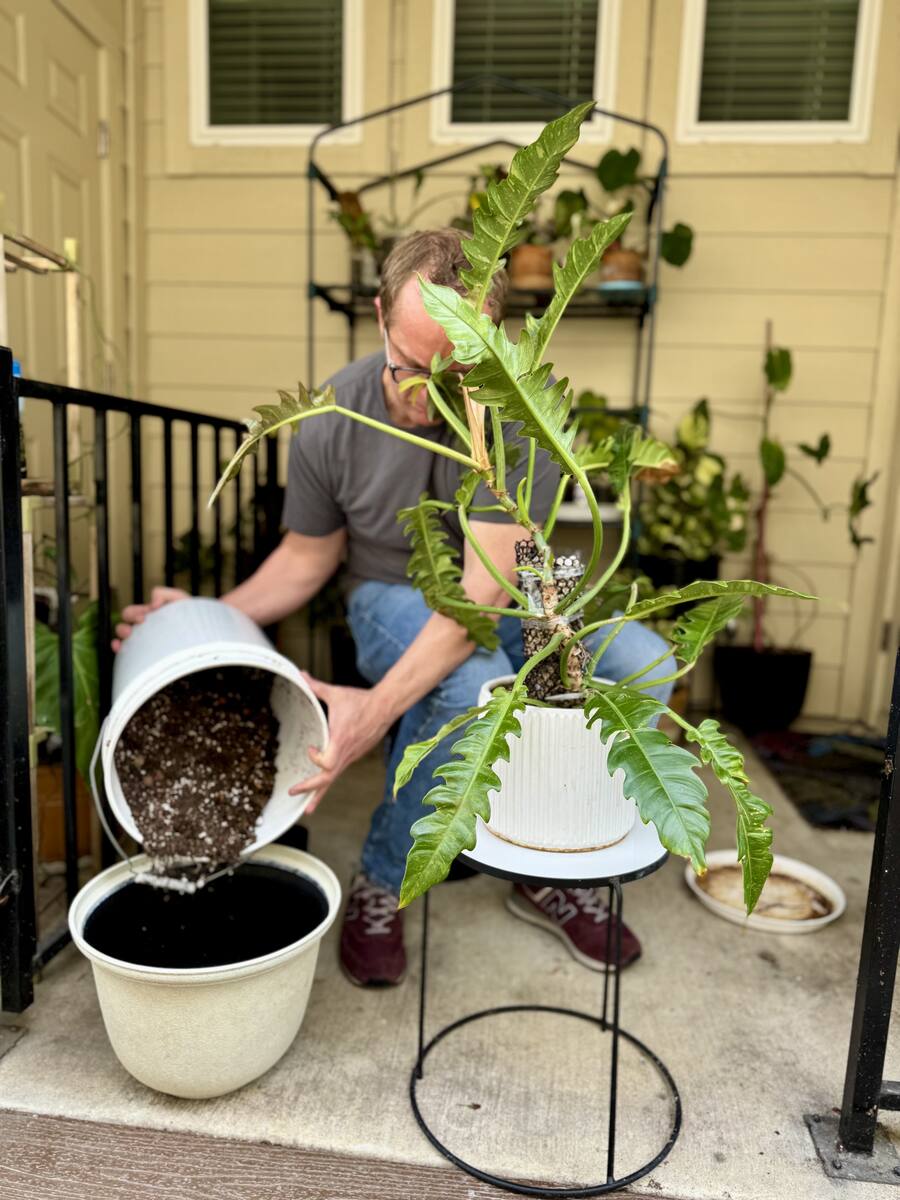
    Water the plant the day before you repot — moist roots are more flexible and less likely to snap. Pull the plant out by tipping the pot sideways and squeezing the sides; never yank from the stem. If the rootball is dense and circling, gently loosen the bottom and sides with your fingers to encourage new roots outward instead of around.

    Put a couple inches of fresh soil in the bottom of the new pot, set the plant in so the top of the rootball is about an inch below the rim, and fill around the sides with fresh soil. Tamp it down gently — not packed, just firm enough that there are no air pockets. Water thoroughly with filtered or distilled water (skip tap on day one, since you don’t want to add hard water stress on top of transplant stress), and put the plant back in a slightly shadier spot than usual for the next two weeks while it recovers.

    Don’t fertilize for at least a month. The fresh soil already has nutrients, and the plant doesn’t need anything else while it’s recovering.

    The Mistakes That Kill Plants Three Weeks Later

    Most repotting failures don’t show up immediately. They show up two to four weeks later, when the owner’s already convinced they did everything right.

    The biggest one is watering on the old schedule. A freshly repotted plant in a slightly bigger pot of fresh soil holds more water than the old setup did. If you keep watering every five days like you used to, you’ll drown it. Wait until the top two inches of soil are dry, then water — usually that’s an extra few days the first time.

    The second is exposing it to too much light too fast. Even a plant that lived in a south-facing window before repotting needs a week or two in slightly lower light to recover. Pull it three or four feet back from the window for a couple of weeks, then move it back.

    The third is panicking when it drops a leaf or two. Some leaf drop after repotting is normal — the plant is reallocating energy to root growth. If it drops everything, that’s a problem. If it drops one or two old leaves and looks a little tired for two weeks, that’s expected.

    When to Have Someone Else Do It

    If you’ve got a large specimen — anything over four feet tall, anything heavy enough that you can’t lift it alone, or any plant you’ve owned for more than five years and don’t want to lose — get help. A fiddle leaf fig or a Bird of Paradise at full size is a two-person job, and the cost of getting it wrong is replacing a $300+ plant. Keep Austin Watered handles repotting visits across Austin, Dripping Springs, Lakeway, and the Hill Country — I bring the right pot, the right soil mix for your specific plant, and the experience to do it without putting the plant into shock.

    For smaller plants, this is something you can absolutely do yourself. Read the section above, pick the right weekend in March or early April, and take your time. Book a consult if you want a walk-through on your specific plants before you start.

    Skip the dirty work: I offer repotting as a one-time house call anywhere in Austin — I bring the pot, the right soil mix for our water, and 25 years of experience. You keep your kitchen clean. Every household and every plant is different, so it starts with a free consult: tell me what you’ve got and I’ll give you a straight answer on price.

    Further Reading

  • Brown Tips on Houseplants in Austin: What’s Actually Causing It

    Brown Tips on Houseplants in Austin: What’s Actually Causing It

    Of every text I get from new clients, “why are my plant’s leaf tips turning brown?” is probably the most common one. I’ve seen it on Monsteras in South Congress condos, on calatheas in Westlake living rooms, on spider plants hanging from the ceiling at a Dripping Springs ranch house. The leaves look fine — green, healthy, growing — except for that dry, papery brown edge along the tip of every leaf.

    In most parts of the country, brown leaf tips can mean a dozen things. In Austin, it’s almost always one of four. After 25+ years working with plants here, I can usually narrow it down from a single photo. Here’s how to figure out which one is yours, and what to actually do about it.

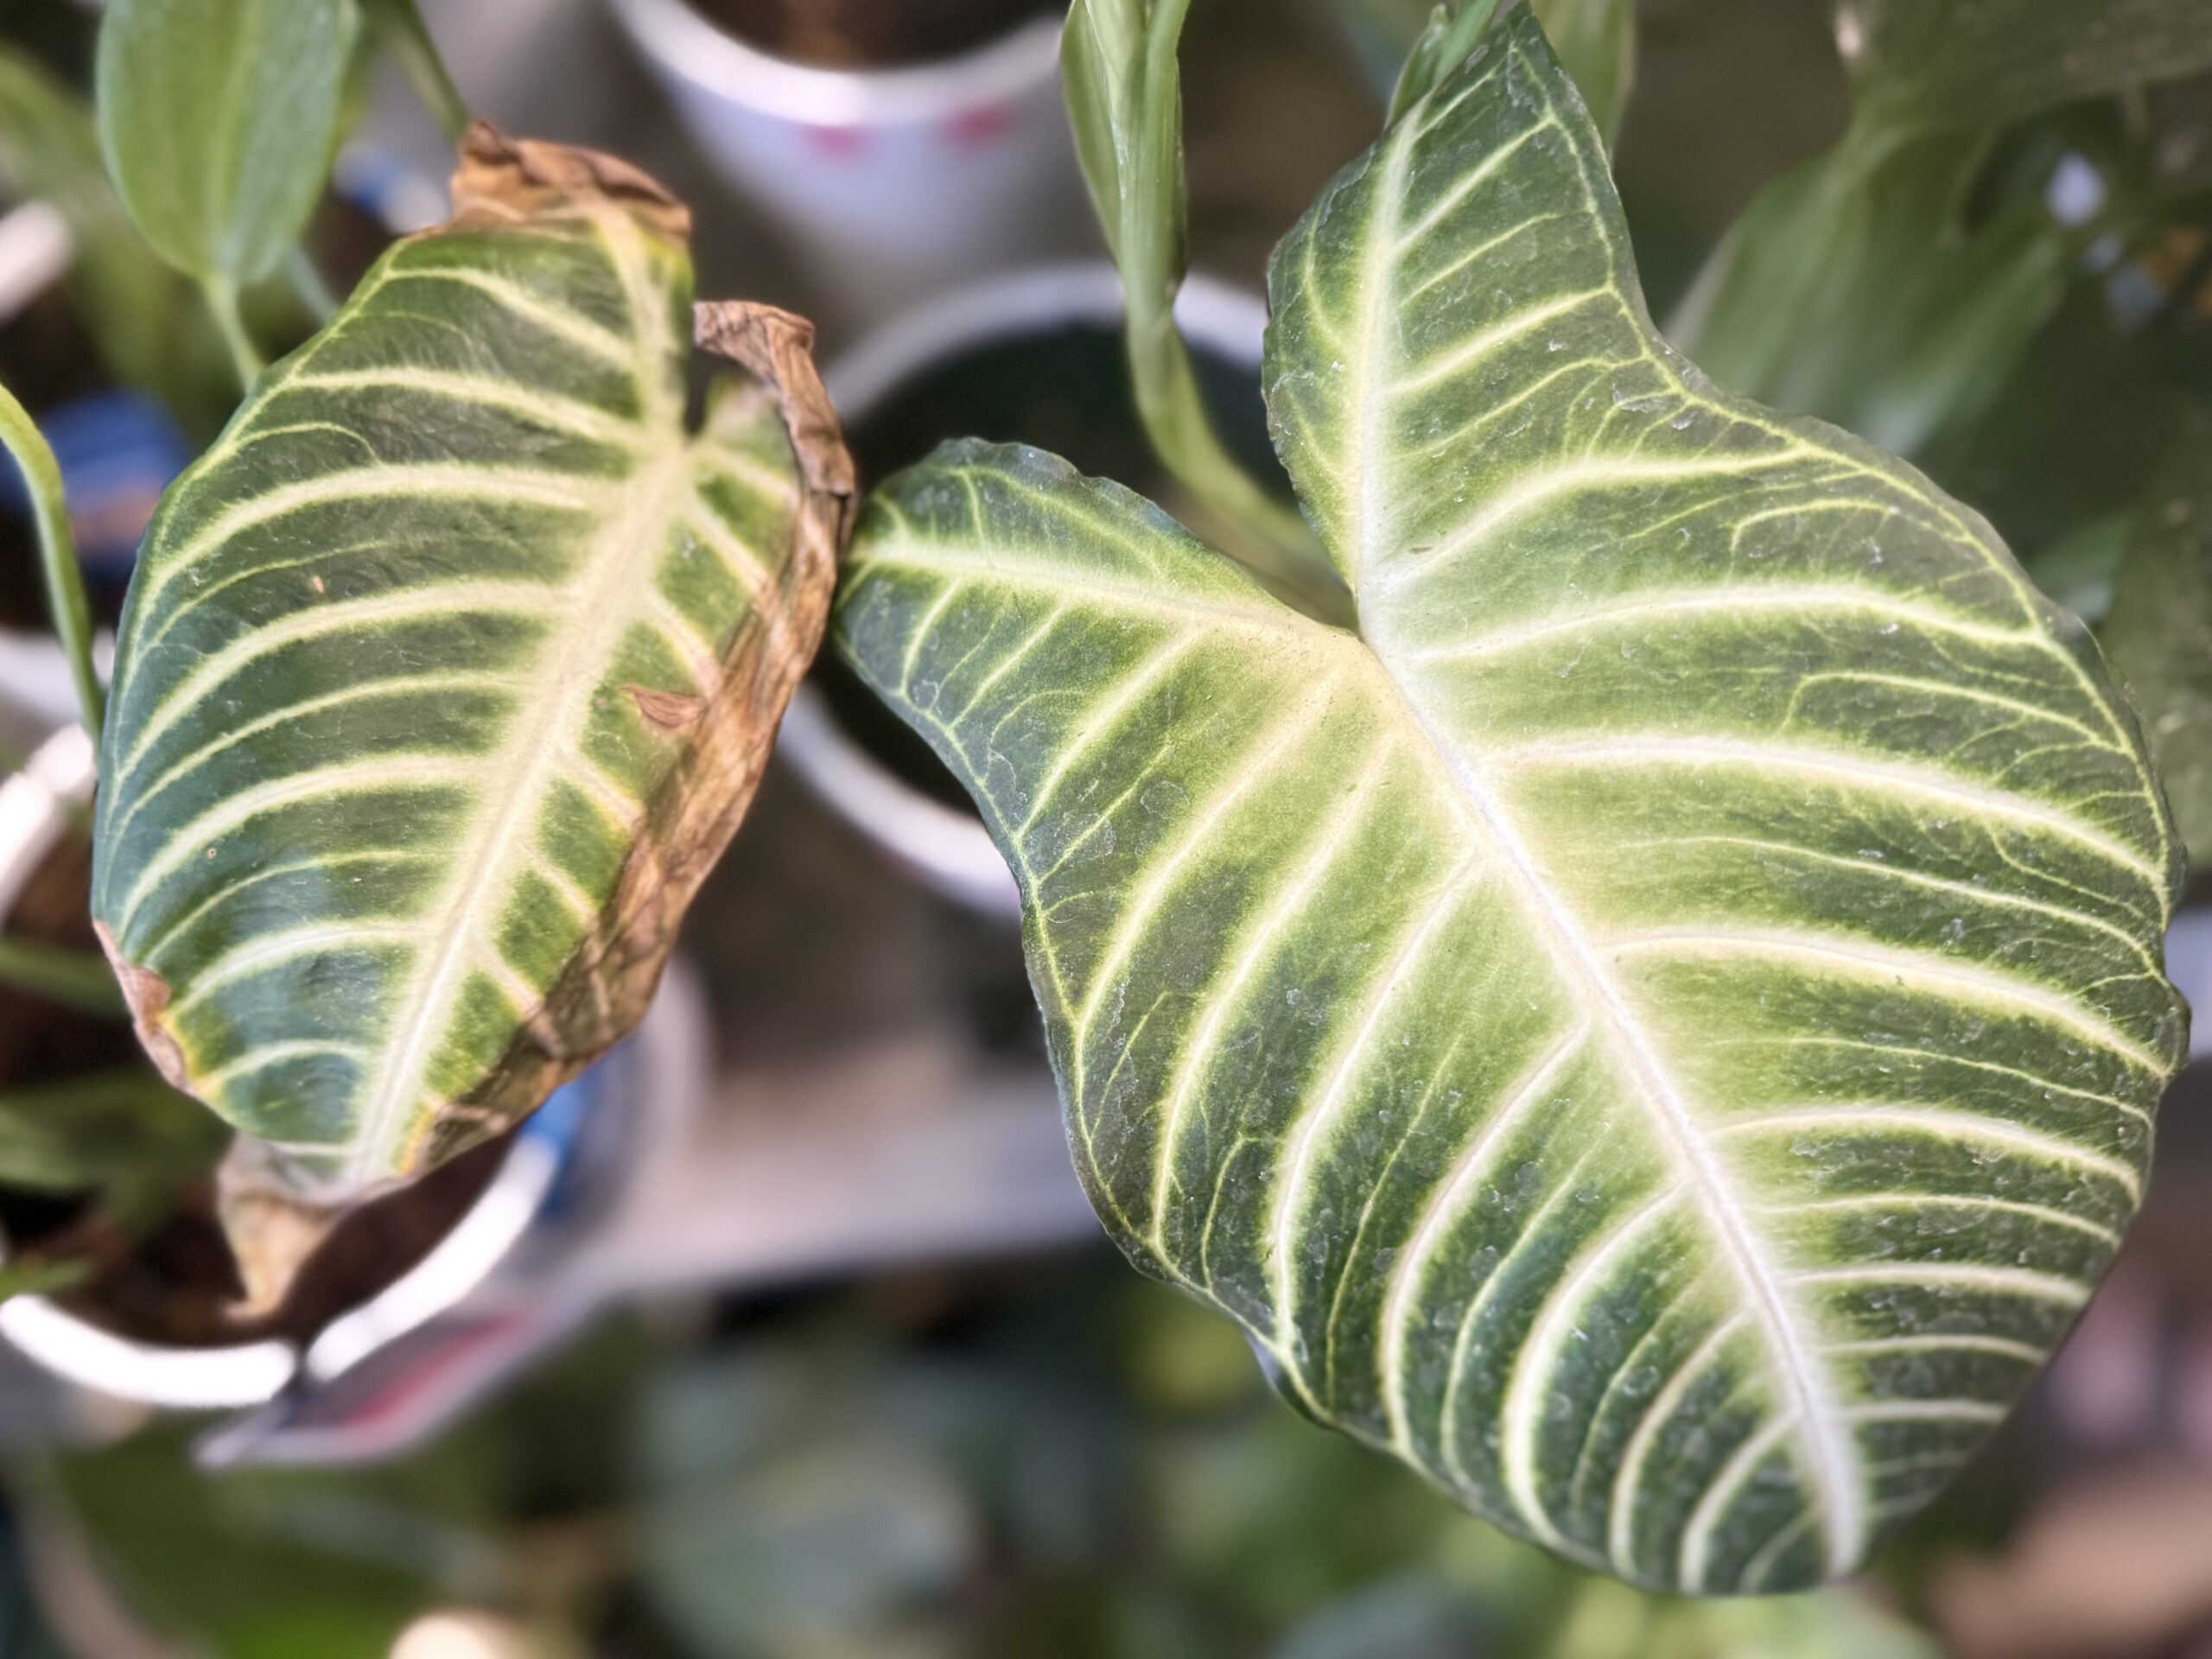
    Houseplant leaf with crispy brown edges beside a healthy green leaf — a common Austin hard water and low-humidity symptom
    Left is what you want. Right is what Austin tap water and 25% AC humidity do to a leaf over a few months.

    Cause #1: Austin’s Hard Water Is the Most Common Culprit

    Austin tap comes out of the Highland Lakes — Lake Travis, Lake Buchanan, that whole Colorado River system — and runs around 290 mg/L hardness on the LCRA reports. That’s hard. It’s also disinfected with chloramine instead of chlorine, which means you can’t just let your watering can sit out overnight to deal with it.

    Every time you water with straight tap, you’re depositing calcium, magnesium, and chloramine into the soil. The plant absorbs water, but those minerals stay behind and build up over months. Sensitive species — calatheas, prayer plants, spider plants, fiddle leaf figs, dracaenas — start showing it first, with crispy brown tips that work their way inward over time. You’ll often see a white crust on the soil surface or on the rim of the pot when this is happening.

    The fix: Switch to filtered or distilled water for sensitive plants. A cheap pitcher filter works for casual users; if you’re serious, a reverse osmosis system under the sink is the long-term answer. Then flush the existing soil — water heavily until water runs out the drainage hole, three times in a row — to wash out the built-up salts. My Austin hard water guide goes deep on which plants are most sensitive and exactly how to set up filtered watering without spending a fortune.

    Cause #2: Your Plant Is Sitting in an AC Crosswind

    Austin’s other big plant killer is the air itself. AC units here run hard from April through October — sometimes ten months a year — and that constant cycle pulls indoor humidity down to 20-30%, which is closer to a desert than a tropical forest. Plants near a vent, or in the direct path of a return, get blasted with dry, cold air every time the system kicks on.

    Brown tips from low humidity look slightly different from hard water tips. They’re usually drier, more brittle, and they show up on the leaves closest to the airflow first. If you’ve got a Monstera with one side perfect and the other side crispy, look up — there’s almost always a vent pointing at the bad side.

    The fix: Move the plant first. That solves it 80% of the time without you doing anything else. If you can’t move it, redirect the vent with one of those plastic deflectors from Home Depot, or group plants together so they create their own humid microclimate. Pebble trays under the pot help a little but get oversold — the real answer is location. My full breakdown of surviving Austin summer with houseplants covers humidity strategies that actually work in our AC-dominated homes.

    Cause #3: You’re Underwatering, Not Overwatering

    This one surprises people. Most Austin plant owners are so worried about root rot that they swing too far the other way and let the plant get bone-dry between waterings. In our climate, with AC pulling moisture out of the soil constantly, “let it dry out completely” can mean two weeks of severe drought stress for a tropical plant that wants its soil consistently moist.

    Brown tips from chronic underwatering look uniform across the plant — every leaf has the same little brown edge — and the plant often feels lightweight when you lift the pot. The soil will be pulled away from the sides of the container, and water you pour in will run straight through without absorbing.

    The fix: Stick your finger two inches into the soil before you water. If it’s dry that deep, water thoroughly until it drains out the bottom. If the soil has already pulled away from the sides, you’ll need to bottom-water — set the pot in a few inches of water and let it soak up from below for 20 minutes — to rehydrate the rootball properly. Then commit to checking every plant on a regular schedule, not “when you remember.”

    Cause #4: Salt Buildup From Overfertilizing

    The fourth cause shows up in people who are trying to be good plant parents. You bought fertilizer, you’re using it every two weeks like the bottle says, and now your plant has brown crispy tips and looks worse than it did when you started. What happened is fertilizer salts have built up in the soil, and they’re pulling moisture out of the roots instead of feeding them.

    This is especially common in Austin because our hard water already deposits minerals — and then you’re adding fertilizer on top of that. The white crust on the soil isn’t always calcium; sometimes it’s fertilizer salts. The fix is the same flush I mentioned in Cause #1: heavy water through the soil, three times in a row, until the runoff is clear.

    The fix: Cut your fertilizer dose in half from whatever the bottle recommends, and only fertilize during active growing season (March through October in Austin). Most houseplants don’t need fertilizer in winter at all. If you’ve been overdoing it, do a soil flush now and skip the next two feedings.

    How to Tell Which One Is Yours

    If you can’t figure out which cause you’re dealing with, here’s the diagnostic order I use when I walk into a client’s house:

    First, I look at the soil surface — white crust means hard water or fertilizer buildup, dry pulled-away soil means underwatering. Then I look at where the brown tips are concentrated — one side of the plant means AC airflow, all over evenly means a watering or water-quality issue. Then I ask about their schedule — how often they water, what they water with, whether they fertilize. Nine times out of ten, that walks me to the answer in 30 seconds.

    For most Austin homes, the real answer is some combination of hard water and AC airflow working together. Fix both and you’ll see new growth come in clean within a couple of months. The browned tips that are already there won’t heal — you can trim them off with sharp scissors if they bother you — but new leaves will look right.

    When to Bring in Help

    If you’ve got more than a couple of plants with this issue, or you’re managing a commercial space and the plants aren’t looking the way they did when they were installed, that’s where I help. Keep Austin Watered handles diagnostic visits across Austin, Dripping Springs, Lakeway, and the Hill Country. I walk through the space, figure out what’s going wrong with each plant, set up a watering protocol that accounts for your specific water source and AC layout, and either rescue what’s there or replace what’s too far gone.

    If it’s just one plant, text me a photo. If you want someone to come look in person, book a free consult.

    Tired of fighting it? If you’ve been killing plants on repeat, my kill-proof collection is built for exactly this. Plants I’ve watched survive Austin homes through travel, neglect, blasting AC, and forgotten waterings — same architectural look, none of the brown-tip headaches.

    Further Reading

    Related: on a well or a softener out in the Hill Country? It is a leading cause — see how well water and softeners damage houseplants.

  • Snake Plant Care in Austin (The Plant That Actually Survives Here)

    Snake Plant Care in Austin (The Plant That Actually Survives Here)

    Every week someone walks into a conversation with me and says, “I want a plant I can’t kill.” I usually answer with one word: snake plant. After 25+ years moving plants in and out of Austin homes, I’ve stopped being precious about it — if you want something that survives our hard water, our AC, and the week you forgot to water before flying to Colorado, this is the plant.

    But here’s where most Austin beginners go wrong: they buy a snake plant, treat it like every other houseplant, and watch it rot from the bottom in six weeks. The plant didn’t fail. The advice did. Snake plants thrive in Austin specifically because of how dry our indoor air gets — but only if you stop watering them like a pothos.

    Here’s exactly what I tell my clients about snake plants in Central Texas.

    Problem #1: You’re Watering Way Too Much

    This is the single reason snake plants die in Austin. The plant evolved in West Africa, in soil that goes bone-dry for months. Then it sits in your house, where the AC runs from April through October and indoor humidity drops to the low 20s, and you water it every Sunday like it’s a fern. The leaves get soft, the base turns brown, and by the time you notice, the rhizome is already rotted out.

    My rule for snake plants in Austin: water once every three to four weeks in summer when the AC is running, and once every six to eight weeks in winter. That’s it. Stick your finger two inches into the soil — if you feel any moisture at all, walk away. The plant is happier thirsty than wet. If you forget for a month, that’s not neglect, that’s correct.

    Problem #2: Austin Tap Water Is Burning the Leaf Tips

    Snake plants tolerate Austin’s hard water better than almost any houseplant I work with, but “tolerate” is not “love.” After a year or two of straight tap, you’ll start seeing brown, papery tips on the tallest leaves and a white crust on the soil surface. That’s calcium and chloramine building up from our Highland Lakes water.

    You don’t need a filtration system for this plant. Just let your watering can sit out uncovered for 24 hours before you use it — that’s enough to let the chloramine off-gas. If you want to go a step further, water with filtered or distilled water every third watering to flush the salts through. For the full breakdown of what Austin water does to houseplants, my Austin hard water guide walks through it.

    Problem #3: You Put It in a Dark Corner Because Someone Said It’s “Low Light”

    This is the second-biggest snake plant myth, and it’s responsible for a lot of slow, sad plants in Austin condos. Snake plants survive low light. They don’t thrive in it. A snake plant in a north-facing hallway will stay alive for years and never push a new leaf — and then one day you’ll notice the whole plant is leaning toward whatever window is closest, with leaves that are floppy instead of standing straight up.

    Give it a spot with bright indirect light. East-facing windows are perfect in Austin — strong morning sun, then shade by the time the afternoon heat hits. South and west work too, but pull the plant three or four feet back from the glass in summer. Direct Texas sun through a south-facing window in July will scorch the leaves in an afternoon. If your space is genuinely low-light, the snake plant will live, but expect it to look the same five years from now as it does today.

    Problem #4: The Setup It Came in Isn’t Built for the Long Haul

    Most snake plants come from the grower in an inner pot tucked inside a decorative cachepot. That setup looks great and works fine for months — snake plants tolerate it better than almost anything else in your house. But over a year or two the soil compacts, the cachepot collects water you can’t see, and the rhizome eventually tells on you.

    When you’re ready to set it up for the next decade, move it into terracotta one size up with a fast-draining cactus or succulent mix. The unglazed clay wicks moisture out of the soil, which is exactly what this plant wants in Austin’s AC-dried air. If you bought your plant at Home Depot or Lowe’s, my post on why big box plants die covers what else is worth swapping out.

    Problem #5: You’re Repotting It Every Year

    Snake plants want to be root-bound. That’s not me being lazy — that’s how the rhizome triggers new leaf production. When you repot a snake plant into a pot two sizes bigger every spring because “it must want more room,” you’re actually slowing it down and giving the roots more soil to stay wet in, which loops you back to Problem #1.

    I repot snake plants in Austin once every three to four years, and only when I can see roots curling out of the drainage hole or actually cracking the terracotta. When you do repot, go up one size, no more. And do it in March or early April, before the heat hits — repotting a plant in August in Austin is asking for trouble, even with a tough plant like this.

    Which Variety to Buy in Austin

    Here’s something most people don’t realize: when they picture a “snake plant,” they’re picturing one variety. The whole group goes by Sansevieria — botanists reclassified them into Dracaena a few years back, but every nursery and every customer I’ve ever met still says Sansevieria, so I do too — and the range of looks hiding under that one name is wild.

    The classic tall green-and-yellow snake plant (Dracaena trifasciata ‘Laurentii’) is the easiest entry point and what I recommend to almost every new client. It gets to 3–4 feet tall, holds up to neglect, and looks architectural in pretty much any room. Drop the yellow edges and you’ve got ‘Zeylanica’, with wavy gray-green crossbands instead. If you want something softer, the ‘Moonshine’ variety has pale silver-green leaves that read almost blue in the right light — beautiful in a modern Austin condo or a Hill Country home with lots of stone and wood. ‘Black Coral’ is a darker, slightly smaller version that works well on a desk or nightstand.

    From there it gets fun. ‘Bird’s Nest’ (often sold as ‘Hahnii’) is a tight little six-inch rosette that fits on a desk or a bathroom shelf — I put a lot of those in the offices I service. And if you want a real conversation piece, the ‘Whale Fin’ (masoniana) sends up a single enormous paddle of a leaf, sometimes a foot wide, that looks more like sculpture than houseplant. You could fill a whole room with nothing but Sansevierias and have it look like a dozen completely different plants.

    For your first one, though, keep it simple: Laurentii, Moonshine, and Black Coral all handle Austin conditions the same way, so pick on looks. The one group I’d steer a beginner away from is the cylindrical “African spear” types — they’re trickier with watering and rot more easily in our humidity swings.

    When to Call Someone

    Most people don’t need help with a snake plant. That’s the whole point. But if you’ve inherited a six-foot specimen that’s been in the same pot for a decade, or you’ve got a commercial space where you need a row of matched plants that will look the same in two years as they do on installation day, that’s where I come in. Keep Austin Watered handles snake plant installations and maintenance for offices, restaurants, and homes across Austin, Dripping Springs, Lakeway, and the Hill Country. We choose the right variety, source mature plants, repot them properly the first time, and keep them on a watering schedule that actually fits Austin.

    Where to Actually Buy a Healthy Snake Plant in Austin

    Half the people searching for a snake plant in Austin aren’t really after care tips — they just want to know where to get one that won’t be half-dead in a month. Fair enough. So here’s my honest take after 25 years of buying plants in this town.

    Skip the big-box garden centers if you can. The snake plants stacked on those racks have usually been sitting under low light, watered on a sprinkler timer, and trucked in from a humid Florida greenhouse — so they look fine on the shelf and then crash the moment they hit your dry, air-conditioned Austin house. (I get into exactly why that happens in why big box store plants die.) Your safer bet is a local independent nursery, where the plants have already adjusted to Central Texas conditions and someone can actually tell you how that specific one was grown.

    And if you’d rather not gamble on it at all, sourcing healthy, Austin-acclimated plants for folks is a big part of what I do.

    If you’ve got one plant that’s struggling, send me a photo. If you want a styled space, book a free consult and we’ll walk through it together.

    Giving one as a gift? Good call — a snake plant is the right pick for the recipient who has killed every plant they’ve ever owned. Pot it in something that drains, skip the fancy stuff, and it will outlast the card.

    Further Reading

  • Tropical Houseplants Outdoors in Austin: The Do’s and Don’ts

    Tropical Houseplants Outdoors in Austin: The Do’s and Don’ts

    Every March, the same thing happens. The first weekend it cracks 75°F, half my clients text me a photo of their living room and ask, “Is it time to put them out?” By the next week, half of those same plants are either thriving on a porch or crisped to a husk on a west-facing patio. There’s almost no in-between.

    I’ve been moving tropical houseplants in and out of Austin homes for over twenty-five years. The payoff for getting it right is real — your Monstera will throw a leaf the size of a dinner plate, your Bird of Paradise will actually look like the picture on the tag, and your fiddle leaf will push more growth in four months on a porch than it did in four years inside. But Austin punishes the small mistakes harder than just about anywhere else I’ve worked. We get tropical humidity, desert sun, and surprise freezes in the same calendar year.

    Here are the rules I follow with my own plants, and the ones I give clients before they move a single pot outside.

    Rule #1: 40°F Is the Hard Floor — And You Watch the Forecast Two Days Out

    Most tropicals start showing cold damage between 45°F and 50°F. By the time you hit the high 30s, you’re not talking about stressed leaves anymore — you’re talking about black, mushy stems and a plant that may or may not come back. Forty degrees Fahrenheit is the line I draw, and I draw it generously.

    The Austin problem isn’t the cold itself. It’s how fast our cold fronts move. A blue norther can drop us 30°F in six hours. I’ve watched a 78°F afternoon in November turn into a 38°F dawn the next morning, and the forecast the night before only called for a low of 52°F. If you wait until the morning of to bring your plants in, you’ve already lost. The rule I use: if the forecast shows anything in the low 40s within 48 hours, plants come in the night before. Not the morning of. The night before.

    This matters double for anything in a terra cotta or thin ceramic pot — those pots lose heat fast, and the root ball will drop below ambient air temperature on a clear night. If you’ve already lived through what a real freeze does to Austin landscapes, you know exactly what I’m talking about. I keep a more detailed playbook for cold weather in my Austin freeze prep guide, and I’d read it before your first fall outside.

    Rule #2: South-Facing Porch With Morning Sun Only — And Stay Off the West Side

    This is the rule that surprises people the most. They assume tropical plants want full sun because they’re, well, tropical. But almost every tropical we keep as a houseplant — Monsteras, philodendrons, pothos, ZZs, calatheas, even most ficus — evolved under a rainforest canopy. They get dappled, filtered light in their native range. Bright, yes. Direct Texas summer sun, no.

    A south-facing porch with morning sun is the sweet spot in Austin. You get good light from sunup through about 11 a.m., and then the overhang or the building itself shades the plants through the worst of the day. East-facing works too — same logic, even gentler. What you want to avoid, almost without exception, is a west or southwest exposure in the afternoon. By 3 p.m. in June, west-facing patios in Austin are radiating heat off limestone, stucco, and concrete. Surface temperatures on a west-facing porch slab can hit 140°F. Leaves don’t burn — they cook. And the radiant heat keeps cooking them well after the sun is technically off the plant.

    If your only option is west-facing, you need shade cloth (30-50%), and you need to pull plants back from the railing by at least three feet to escape the worst of the reflected heat. Even then, the toughest tropicals are going to look stressed by August. There’s a reason I have a whole separate guide on surviving Austin summers with houseplants — the heat here is its own category of problem.

    Rule #3: Acclimate Slowly — Both Directions

    You cannot take a plant that’s been living in 72°F filtered indoor light and drop it on a porch for eight hours of even gentle morning sun. The leaves will sunburn within a single day. I’ve seen it happen by lunchtime.

    The acclimation curve I use, going out in spring: two hours of porch time on day one, four hours on day two, six on day three, and a full day by day five or six. Pick a stretch of overcast weather to start if you can — Austin in March and early April gives you plenty of cloudy days to work with. By the end of the first week, your plant has built up enough wax on its leaves and adjusted its chloroplasts to handle the outdoor light load.

    Going back inside in September or October is the reverse, and people forget about this half. A plant that’s been on a porch at 85°F with 70% humidity, when dropped into a 72°F room with the AC pulling humidity down to 40%, will shed leaves and look terrible within a week. Same gradual transition in reverse — start with a few hours indoors, build up. And keep them away from AC vents for the first month back inside. That AC blast is what kills more recovered porch plants than any pest.

    Rule #4: The Pest Problem Nobody Warns You About

    This is the section I wish someone had written for me twenty years ago. Outdoor time is the single best thing you can do for a tropical plant’s growth. It’s also the single most likely way to bring a serious infestation into your house. There are four pests in Austin that I genuinely worry about, and you need to know what each one looks like before you carry a single plant back inside.

    Spider mites are the worst of the four and the most common. They’re nearly invisible — smaller than a poppy seed — and you almost never spot them until the damage is done. Look for tiny pale stipples on the upper side of leaves, fine webbing tucked into leaf axils and along stems, and a dusty look to the underside of leaves. The diagnostic trick I use: hold a piece of white paper under a leaf and tap it sharply. If specks fall onto the paper and start moving, you have mites. They love hot dry conditions, which means they thrive on Austin porches in late summer and absolutely explode the moment you bring the plant inside to AC air.

    Thrips are the sneakiest. Silvery-bronze streaks on leaves, especially near the veins, are the giveaway, along with tiny black dots of frass that look like pepper flakes. The bugs themselves are skinny slivers about the size of a comma on this page, and they hide deep in new growth and folded-up leaves. By the time you can see them with the naked eye, you usually have hundreds. Thrips love the hot dry afternoons that follow our August thunderstorms, so any porch plant is a candidate.

    Mealybugs announce themselves: little white cottony tufts wedged into leaf joints, along stems, and at the base of new growth. They look like the plant has fluff stuck to it. One mealybug-infested plant brought indoors will spread to every plant within reach within a month — they crawl, and they ride on your hands and clothes. They’re especially fond of hoyas, succulents, and anything with tight crowded nodes like a string of pearls or a stacked philodendron.

    Scale is the one most people miss entirely. The bugs disguise themselves as small brown, tan, or gray bumps along stems and the undersides of leaves — they look like part of the plant. If you scrape one off with a fingernail and it comes loose easily, that’s scale. By the time you notice them, they’ve usually been there for weeks, and they’re the hardest of the four to kill because their waxy shell repels contact sprays.

    The protocol I use before any plant comes back inside: full leaf inspection top and bottom under good light, a strong hose-down of the whole plant including the underside of every leaf, a thorough insecticidal soap spray hitting every surface, and a soak-and-drain of the pot to flush the soil. For larger plants I’ll refresh the top two inches of potting mix. If I find scale during inspection, I add a systemic insecticide (something with imidacloprid) because soap alone won’t penetrate the shell. If a plant came home from a big box store in the last year, I treat it as extra suspect — see my post on why big box store plants die for the longer version of that story. They often arrive with pests already, and a summer outdoors gives those populations room to multiply.

    The other quiet problem: spider mites explode when you move a plant from an 85°F humid porch into 72°F AC air. The bugs were probably already on the plant. They were just being held in check by the outdoor humidity and the natural predators that come with being outside — lacewings, ladybugs, predatory mites. Indoors, with dry air and no predators, two mites become two thousand in about ten days. Always treat preventively before the plant comes in. Don’t wait to see them.

    Rule #5: This Is Where the Magic Happens

    All those rules sound like a lot of work. They are. But here’s why I do it for my own plants and recommend it to every client who’s willing to put in the effort: Austin’s climate, from late April through early October, is genuinely tropical. Our average summer dew point now sits around 67°F, our humidity runs 70-90% from June through August, and our nighttime lows in July and August hold above 75°F. That’s Costa Rica weather. That’s where Monsteras come from.

    A houseplant indoors in Austin is fighting our climate every single day. The AC strips humidity down to 40%, the hard tap water leaves mineral deposits on the roots, the indoor light is a fraction of what the plant evolved to use. Move that same plant to a shaded south-facing porch in May and within six weeks you’ll see growth you didn’t think was possible. New leaves emerge bigger. Fenestrations open wider on Monsteras. Variegation gets more dramatic. The plant becomes the thing it was supposed to be.

    The other gift: real rainwater. Austin tap water is hard and chloraminated — we get our water from the Highland Lakes off the Colorado River, and it runs around 290 mg/L hardness with a pH near 8. That mineral load builds up in indoor pots over years and slowly poisons roots. I wrote the full story on this in my hard water guide. A summer of spring rains flushes the salts out of the soil better than any amount of distilled water you could pour. Your plant comes back inside in October genuinely healthier than it left.

    The Monstera I keep on my own back porch from April through October has put out forty new leaves over the years I’ve been doing this. The one I tried to keep entirely indoors for the same period — same cutting, same pot — put out six. That’s the difference. (More on getting Monsteras right in my full Monstera guide.)

    One Last Thing: Watering Outside Is a Different Game

    Plants outside in Austin summer can need water daily, sometimes twice a day for smaller pots in terra cotta. The same plant that wanted water once a week indoors might be drinking every 24 hours on a south-facing porch in August. Check the top inch of soil every single day. Don’t trust last week’s schedule.

    And don’t water at noon. Morning is best — between 7 and 9 a.m. — so the leaves dry before the sun gets brutal. Wet leaves at 2 p.m. in Austin August will cook and develop bacterial spots.

    Want Help With the Transitions?

    The spring move-out and the fall move-in are the two weekends where most tropical houseplant disasters happen in Austin. If you travel for work, or if you’ve got a houseful of plants and the idea of acclimating each one over a week sounds exhausting, this is something I handle for clients through Keep Austin Watered. We do the porch placement, the acclimation schedule, the pest treatment before bringing plants back inside, and the transition off AC vents. It’s the kind of thing that’s easy when you’ve done it a thousand times and miserable when you’re learning it on your own plants.

    Book a free consult if you’d like a hand with the transition, or just want me to come look at your porch situation before you commit. Either way — get those plants outside this year. The growth is worth it.


    Further reading

    Going indoor with these? Snake Plant Care in Austin · Fiddle Leaf Fig Alternatives for Austin

  • Fiddle Leaf Fig Care in Austin (And Why Yours Keeps Dying)

    Fiddle Leaf Fig Care in Austin (And Why Yours Keeps Dying)

    Fiddle leaf figs are the plant I get called about more than any other in Austin. Beautiful, expensive, dramatic — and almost always dying by the time I show up.

    It’s usually not the owner’s fault. These plants are sold like decor, with care tags that say things like “water weekly, bright indirect light” and nothing about the actual conditions inside a Central Texas home. Then the leaves start dropping, the brown spots show up, and people assume they’ve killed it.

    After 25+ years working with houseplants in Austin, here’s what I’ve learned: fiddle leaf figs aren’t actually that hard to keep alive. They’re just hard to keep alive using generic advice you’d give someone in Portland or Brooklyn. Austin has its own problems, and once you account for them, this plant will reward you.


    Problem #1: The Soil They Came In Is Wrong

    Almost every fiddle leaf fig I touch in Austin is sitting in dense, peat-heavy nursery mix or straight coco coir. Both hold moisture far too long for a home environment. In a commercial greenhouse with controlled humidity and careful irrigation, that mix is fine. In your living room with the AC running and inconsistent watering, it’s a slow drowning.

    Fiddle leaf figs are native to the lowland rainforests of west Africa. Their roots evolved for soil that’s moist but airy — never waterlogged. The mix you want is well-draining, slightly acidic (pH around 6.0–6.5), and structured enough that it stays airy as it ages.

    What I use: two parts good indoor potting soil, one part orchid bark or pine bark fines, one part perlite or pumice. The bark prevents compaction. The perlite creates air pockets. Skip anything labeled “moisture control” — that’s the opposite of what this plant wants.

    Repot in spring, every two to three years, before Austin summer puts the plant under additional stress. If you’ve had your fiddle leaf for more than a year and you’ve never repotted it, that’s almost certainly part of why it’s struggling.

    Problem #2: Drainage Is Non-Negotiable

    If you take one thing from this post, take this: your fiddle leaf will tolerate a lot of mistakes, but it will not tolerate sitting in water.

    The pot needs drainage holes — ideally more than one. If you’re using a decorative pot without holes, treat it as a cachepot: the plant lives in a nursery pot with drainage that you slip inside the pretty one. When it’s time to water, pull the nursery pot out, water it in the sink, let it drain fully for 15–20 minutes, then return it.

    And skip the “layer of rocks at the bottom” trick. Older books still recommend it, but it actually makes drainage worse — it creates a perched water table that keeps the lower soil wetter for longer. A well-draining soil mix all the way down is what you want.

    Problem #3: You’re Watering on a Schedule Instead of by Feel

    “Water once a week” is the single worst piece of advice attached to this plant.

    In an Austin summer with the AC stripping humidity, your fiddle leaf might want water every 5–7 days. In winter with the heat on and reduced light, that same plant might only want water every 2–3 weeks. The schedule changes with the season, the room, and even the size of the pot.

    What to actually do:

    Stick your finger two inches into the soil. If it’s dry, water. If it’s still damp, wait two more days and check again. When you do water, water thoroughly — until it runs out the bottom — then empty the saucer. Never let the pot sit in standing water.

    A $10 moisture meter from any Austin garden center takes the guesswork out completely. Stick it halfway down, water when it reads dry to slightly moist. That’s it.

    Problem #4: Austin Tap Water Is Slowly Poisoning Your Plant

    This is the one almost nobody warns you about, and it’s the reason fiddle leaf figs that look fine for six months suddenly start declining.

    Austin’s tap water comes out of the Highland Lakes, fed by the Colorado River as it moves through Hill Country limestone. By the time it reaches your tap it’s hard — around 290+ mg/L as calcium carbonate, well above the 200ppm threshold horticulturists consider the upper limit for sensitive houseplants. The pH runs alkaline, often pushing 8 or higher. And Austin Water uses chloramine, not chlorine, to disinfect — which matters because chloramine doesn’t dissipate if you leave water sitting out overnight. That old trick doesn’t work here.

    Fiddle leaf figs want slightly acidic soil. When you water them month after month with alkaline, mineral-heavy tap water, the soil pH slowly climbs. As it climbs, the plant loses the ability to absorb iron, manganese, and phosphorus — even if you’re fertilizing perfectly. The leaves go pale. New growth comes in smaller and yellower. You start seeing a white crust on the soil surface and the pot rim. That’s calcium and magnesium deposits building up, and it means your soil chemistry is drifting away from what this plant needs.

    What to do about it:

    If you only have one fiddle leaf and you want a simple fix, water it with filtered water — a Brita or fridge filter helps with some of it, though not chloramine specifically. Better: collect rainwater when we get a real storm, or use distilled water from the grocery store. Even alternating tap and distilled makes a noticeable difference over time.

    And once or twice a year, flush the pot. Take it to the sink or tub, run water through it until it’s pouring out the bottom, and keep going for a full minute or two. This leaches out the accumulated salts and resets the soil chemistry. Every Austin houseplant owner should be doing this regardless of plant, but fiddle leaf figs especially.

    I cover this in more depth in the Austin Hard Water guide — worth a read if you’ve got more than one plant.

    Problem #5: They Hate Being Moved (Especially in Austin)

    Fiddle leaf figs drop leaves when they’re stressed, and almost anything qualifies as stress: a new room, a new window, a cold draft, a hot AC vent blowing directly on them, or the temperature swing between a sunny window in the afternoon and a cold pane at night.

    Austin makes this worse. Our homes have big windows, open floor plans, and HVAC systems that run hard nine months out of the year. The spot you pick for the plant matters more here than in milder climates.

    What works: bright, indirect light from an east or south-facing window, at least three feet back from the glass in summer, away from direct AC airflow. Once it’s happy somewhere, leave it. Rotate the pot a quarter turn every couple of weeks so growth stays even, but don’t relocate the plant unless you have to.

    Feeding: Less Than You Think

    Fiddle leaf figs are moderate feeders during the growing season (roughly March through October in Austin). Use a balanced liquid fertilizer with an NPK ratio around 3-1-2 — slightly higher nitrogen for foliage. Feed every 2–4 weeks during the growing season, then stop completely from November through February.

    If you see a white crust building up on the soil or pot rim, that’s a sign of either over-fertilization or hard water buildup (often both). Flush the pot as described above, ease off the fertilizer, and let the plant recover before resuming.

    What Recovery Actually Looks Like

    A struggling fiddle leaf doesn’t bounce back in a week. If you fix the soil, the drainage, and the watering, you’ll see results over a month or two — new growth that’s larger and greener than the old growth, fewer dropped leaves, less browning. Old damaged leaves won’t heal. New ones will be the proof.

    The plants I rescue tend to follow the same arc: repot into proper mix, switch to filtered or rainwater, find them a stable spot, then leave them alone. By month three, they look like a different plant.


    If You’d Rather Skip the Troubleshooting

    Fiddle leaf figs are worth the effort, but they’re not for everyone — and they’re definitely not for someone who travels a lot or forgets about them for weeks at a time. If you want one in your house but don’t want to learn its moods, that’s what we do at Keep Austin Watered. We source healthy plants, pot them in the right mix, and care for them on a schedule built around Austin’s specific water, light, and climate. For clients who want a fiddle leaf as a designed statement piece in a Hill Country home, that’s the plant styling work I do in Spanish Oaks.

    No mystery soil. No hard water buildup. No guessing.

    Read next: Fiddle Leaf Fig Alternatives for Austin — if you’re ready to give up on the fiddle leaf entirely, here are three alternatives that actually thrive here.


    Further reading

    Related: a fiddle leaf craves light — here’s how to use a wall of windows to grow one without scorching it.

  • Why Austin Realtors Are Adding Plants to Their Staging Budget

    Why Austin Realtors Are Adding Plants to Their Staging Budget

    It started showing up in my calendar about two years ago — realtors texting instead of homeowners. “I’ve got a listing in Rollingwood going to market next Friday, can you get me three plants by Wednesday?” At first it was one or two. Then it became a regular thing. Now it’s one of the steadier parts of my business, and I want to explain why it makes sense — because I think a lot of Austin realtors and stagers haven’t thought about plants as a staging line item the way they think about furniture rentals or art.

    Plants Do Something Furniture Can’t

    Staged furniture tells a buyer what a room is for. Plants tell a buyer that someone lives here. That distinction matters more than most people realize. (For a longer look at what this looks like in practice, here’s a recent Spanish Oaks consultation.) Buyers walking through a staged home are constantly trying to imagine themselves in it — and an empty, perfectly staged room with no life in it is harder to inhabit mentally than a room with a large, thriving bird of paradise in the corner and a trailing pothos on a shelf. The plants signal: this is a space where things grow. Where someone pays attention. Where the details matter.

    There’s also something purely visual: plants add the organic curves and varied textures that furniture and art simply can’t provide. A room with perfect furniture and zero plants photographs flatter than the same room with one or two well-chosen plants breaking up the straight lines.

    The Austin-Specific Case for It

    Austin buyers — particularly in the Westlake Hills, Barton Creek, Tarrytown, and Spanish Oaks markets — skew toward buyers who are design-conscious and have often moved from cities like New York, San Francisco, or Chicago where indoor plants are a standard part of interior design. They’re not impressed by a staged home that looks like a catalog page. They’re impressed by a staged home that looks like someone with taste actually lived there.

    A large Monstera or bird of paradise in a Westlake Hills living room doesn’t read as “someone put a plant here.” It reads as “this is the kind of home where people care about how things look.” That’s the signal luxury buyers are paying attention to, whether consciously or not.

    What Goes Wrong When Realtors DIY It

    The instinct to grab a few plants from Home Depot or Whole Foods (which is a problem all on its own) on the way to a shoot is understandable. It’s also usually visible in the photos. Here’s what typically goes wrong:

    • Wrong scale. A 6-inch nursery pot in a 14-foot-ceiling living room disappears. The plant has to be sized for the room, not for a windowsill.
    • Wrong light. A plant that needs bright indirect light placed in a dark corner looks stressed within a week — drooping, yellowing, dropping leaves before the open house.
    • Wrong pot. The plastic nursery pot it came in immediately signals “this plant was just placed here.” The container is half the visual impact.
    • Wrong placement. Plants stuffed in corners, lined up on window sills, or clustered together read as décor rather than design. Placement matters as much as selection.

    Every one of these is fixable with about 20 minutes of consultation and a proper plant selection process. The cost difference between doing it right and doing it wrong is negligible at the price point of most Austin listings. The visual difference is significant.

    What Professional Plant Staging Actually Costs

    For a 3–4 bedroom listing, a proper plant staging package — 3 to 5 plants, properly sized, in appropriate containers, delivered and placed by someone who knows what they’re doing — runs $149 to $499 depending on the number of spaces and plant selections. For a $1.2M Westlake Hills listing, that’s a rounding error on the staging budget and a material difference in how the home photographs and shows.

    Plants can be purchased outright (and offered to the buyer as part of the sale, which buyers love) or rented for the listing period and retrieved after closing. Either way, the economics work easily at Austin’s luxury price points.

    How It Works With Keep Austin Watered

    Text me the listing address and your timeline. I’ll visit the space — usually within a day or two — walk the rooms, note the light, and put together a plant plan. Delivery happens the same week. I style the plants on-site, adjust placement based on how things actually look in the space, and leave care instructions for whoever is managing the listing. After closing, I retrieve the plants or the buyer keeps them.

    I work across Austin, Westlake Hills, Dripping Springs, Lakeway, Bee Cave, and the broader Hill Country. If you’ve got a listing coming up and want to talk through what makes sense for it, text me at (512) 829-1467. I respond the same day.

    I run Keep Austin Watered — plant styling and care for Austin homes, businesses, and listings. Here’s how the staging service works.

    For agents who want to leave the homeowner a closing plant: pick something kill-proof — here’s my list of plants that survive anyone.

    Frequently Asked Questions

    Ready to add plants to your next listing? Will serves realtors and stagers across Westlake Hills, Barton Creek, Tarrytown, Rob Roy, Lake Austin, Dripping Springs, and Lakeway. See full staging details →

    Related: office plant service for Austin businesses.

  • Why Your Pothos Is Turning Yellow in Austin (It’s Probably Not What You Think)

    Why Your Pothos Is Turning Yellow in Austin (It’s Probably Not What You Think)

    Pothos is supposed to be unkillable. And mostly it is — until you’re in Austin, and suddenly your gorgeous trailing plant starts turning yellow and you have no idea why. In the last year I’ve gotten this question more than almost any other. The good news: yellowing pothos is almost always fixable. The frustrating news: there are four different things that cause it, and the fix for each one is completely different.

    Here’s how to figure out which one you’re dealing with.

    First: What Does the Yellowing Look Like?

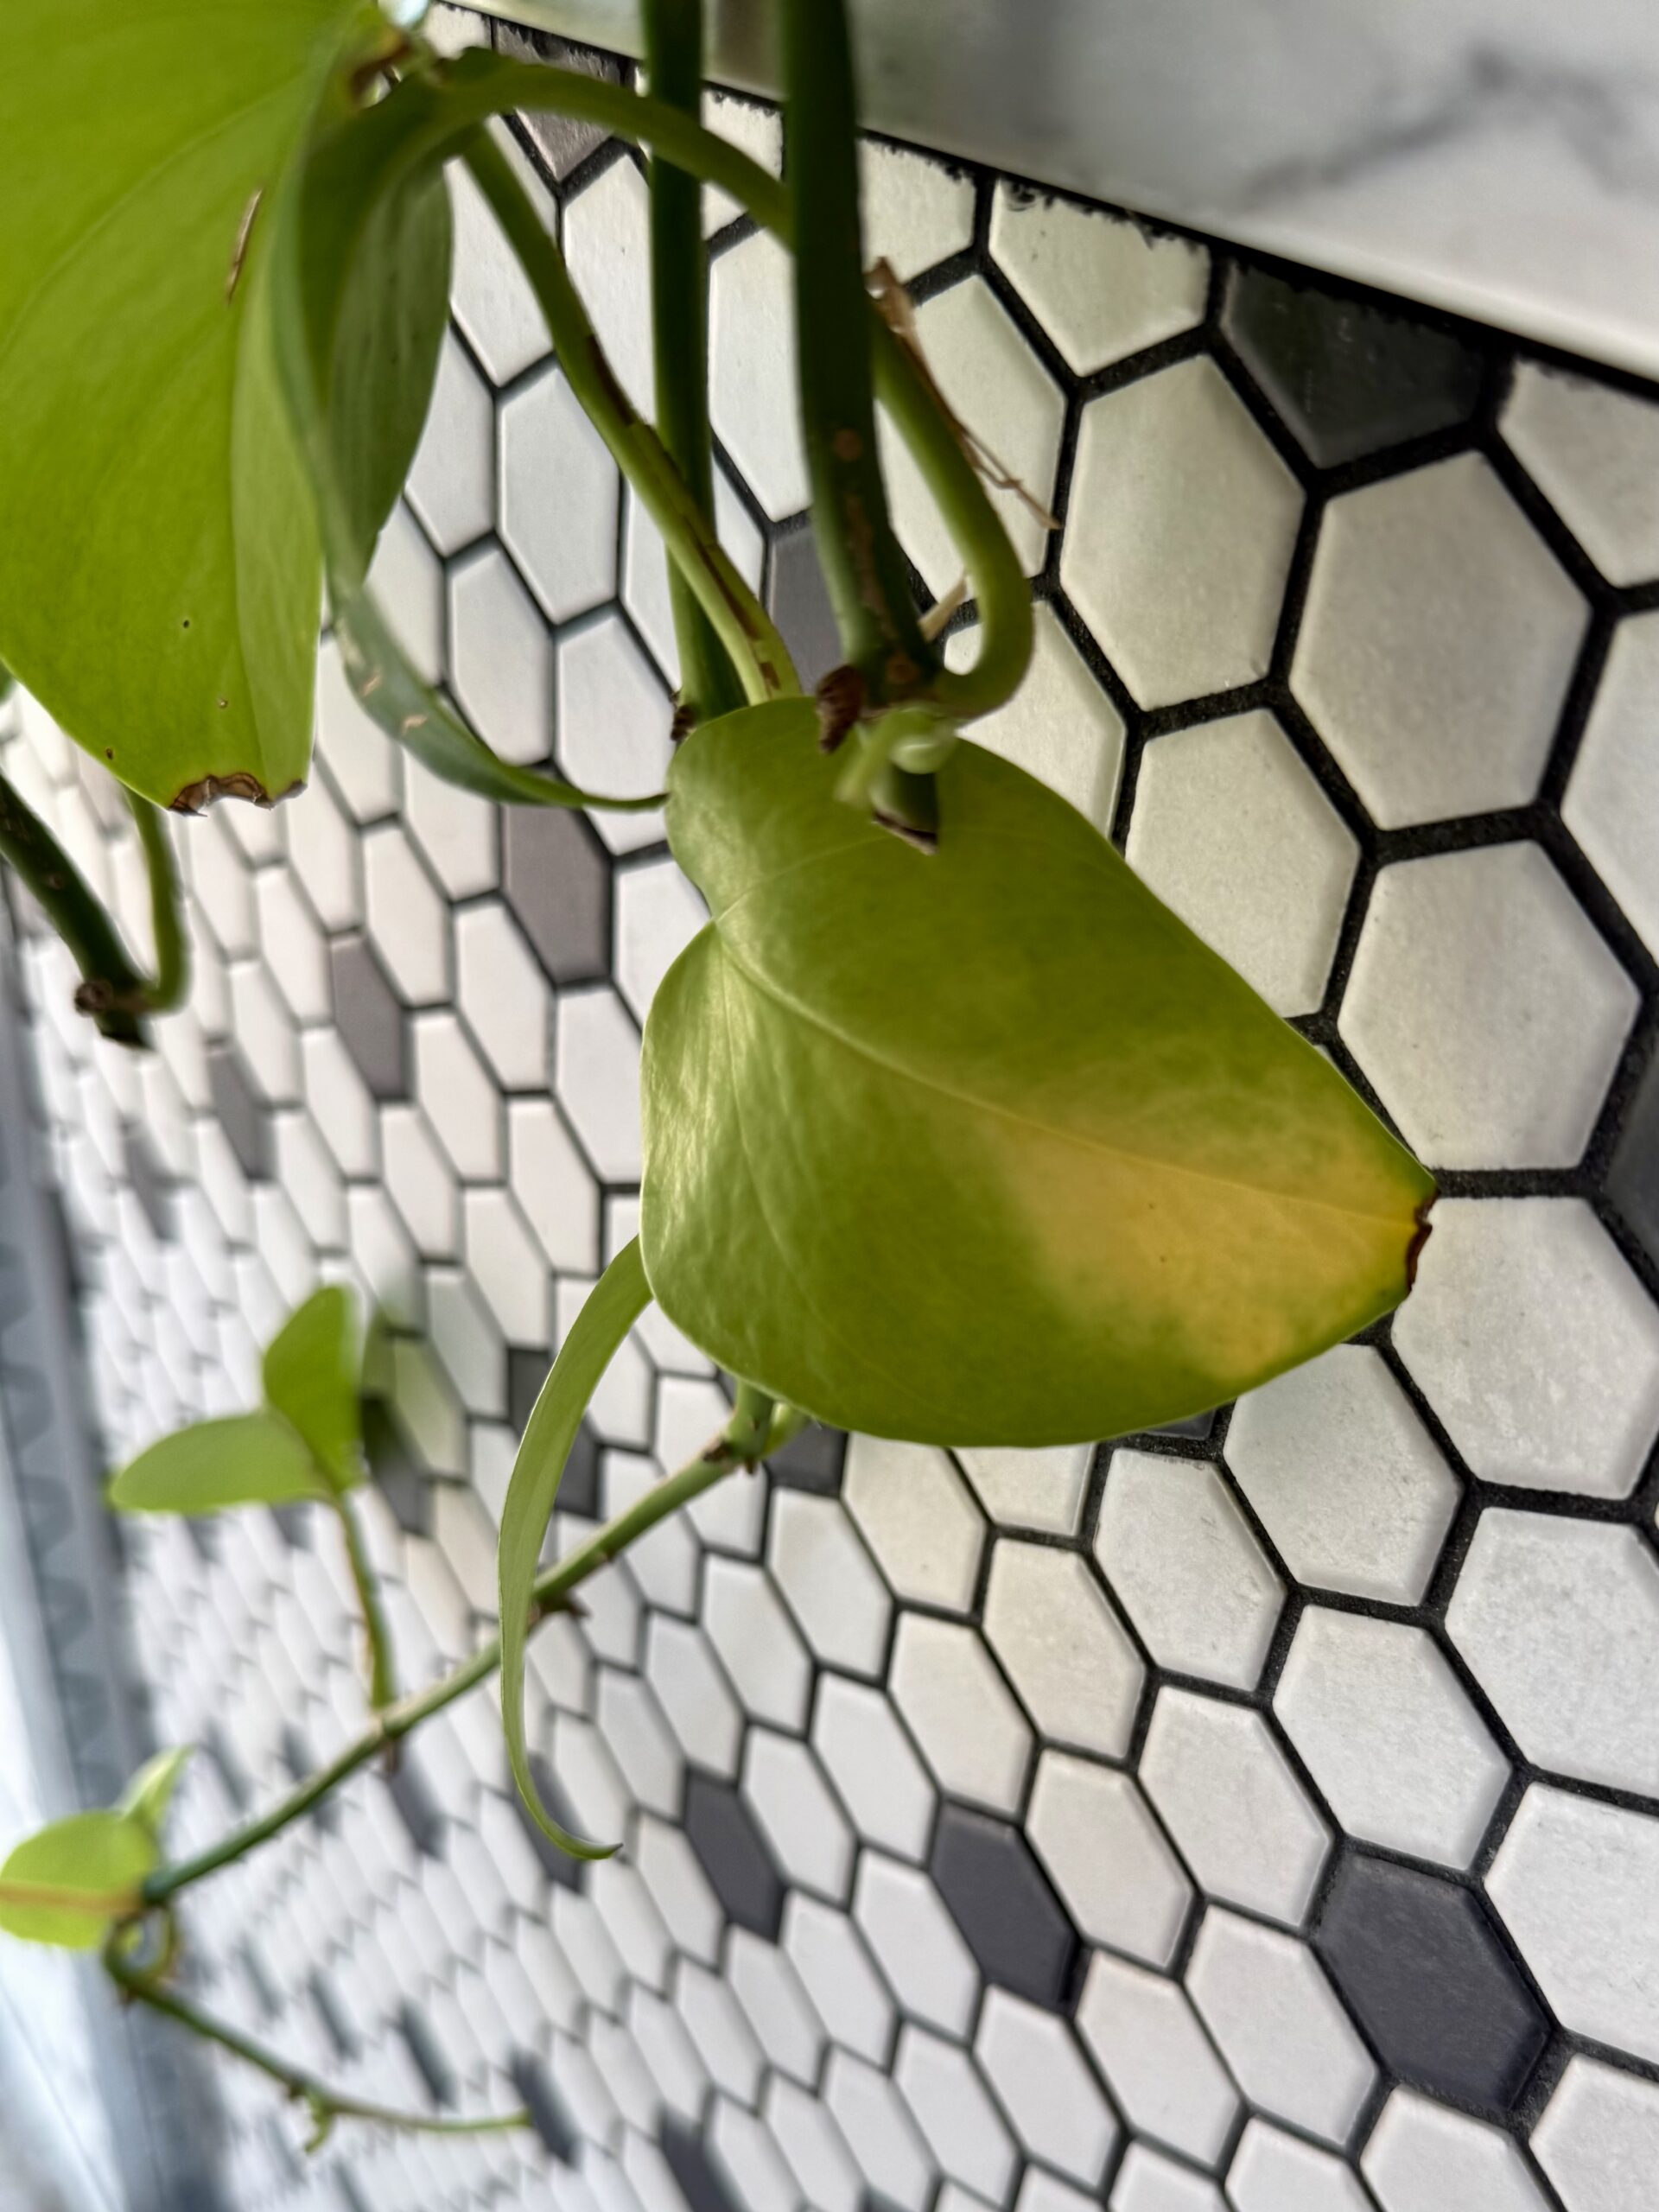
    Yellowing pothos leaf on an Austin houseplant from overwatering and hard water buildup
    This is the color and texture I see most often — and nine times out of ten in Austin, it’s the AC fooling you into overwatering.

    Before I walk through causes, pay attention to where the yellow is appearing and what pattern it follows. That matters enormously for diagnosis.

    • Oldest leaves yellowing first (at the base of the vine): Almost always normal aging or overwatering
    • Yellowing scattered across the plant with no pattern: Usually overwatering or root rot
    • Yellow between the veins, veins staying green: Nutrient deficiency (common in Austin)
    • Yellow patches on leaves that get sunlight: Direct sun scorch
    • Pale, washed-out yellow across the whole plant: Not enough light

    Cause 1: Overwatering (The Most Common Culprit)

    I’ll be direct: most yellowing pothos in Austin are overwatered. Not because Austin plant owners are careless, but because our AC creates conditions that are deceptive. The top inch of soil dries out quickly in an air-conditioned Texas home, so it feels like the plant needs water. But the lower portion of the pot stays wet for much longer than you’d expect.

    The test: push your finger 2 inches into the soil. If it’s still moist, don’t water. Pothos want to dry out significantly between waterings — in Austin summers, that might be every 10–14 days. In winter when the AC isn’t running as hard, it could be 3 weeks.

    If the roots have been sitting in wet soil for a while, check the bottom of the pot. If there’s root rot — roots that are brown, mushy, and smell slightly off rather than white and firm — you need to trim the affected roots, let the root ball dry out slightly, and repot into fresh well-draining soil.

    Cause 2: Austin’s Hard Water (This One Surprises People)

    This is the Austin-specific cause that most generic plant care advice misses entirely. Our tap water — Highland Lakes via the Colorado River for Austin proper, Trinity Aquifer groundwater for Dripping Springs and the Hill Country — carries substantial mineral content, primarily calcium and magnesium. Austin Water also uses chloramine in the treatment process. Over time, repeated watering with Austin tap water causes mineral buildup in the soil, which raises the pH and interferes with the plant’s ability to absorb nutrients even when those nutrients are present.

    The symptom pattern: yellowing that appears between leaf veins (the veins stay green while the leaf tissue between them turns yellow). This is called interveinal chlorosis (covered in detail in the Austin hard water guide) and it’s a sign the plant can’t take up iron or magnesium — not because they’re absent, but because the soil pH is locking them out.

    The fix: flush the soil thoroughly with filtered or distilled water, let it drain completely, and repeat two or three times. This washes accumulated minerals through the drainage holes. Going forward, watering with filtered water or collected rainwater makes a real difference for Austin pothos over time. Alternatively, flush your pots with distilled water every three or four months even if you use tap water the rest of the time.

    Cause 3: Too Much Direct Sun (Common Near Austin Windows)

    Austin has intense sun, and west-facing windows in Texas in the afternoon deliver direct light that’s too harsh for pothos. The plant will show it as pale or scorched patches on the leaves that face the window — sometimes yellow, sometimes papery and translucent. This is easy to solve: move the plant a few feet back from the window, or add a sheer curtain to diffuse the afternoon light. Pothos wants bright indirect light, and in Austin that usually means not being within 2–3 feet of an unfiltered south or west window in summer.

    Cause 4: Nutrient Deficiency (Easy to Fix)

    If your pothos has been in the same pot and same soil for more than a year, it may have exhausted the nutrients in the potting mix. This is especially common in fast-growing Austin plants that have put out a lot of new growth. The fix is simple: a balanced liquid fertilizer (I like a 20-20-20 formula diluted to half strength) once a month during growing season — roughly April through October in Austin. Don’t fertilize in winter; the plant isn’t actively growing and excess fertilizer salts in the soil create their own problems.

    What If It’s None of These?

    If you’ve ruled out overwatering, mineral buildup, sun scorch, and nutrient deficiency, check for pests. Spider mites and mealybugs are common in Austin’s dry AC air, and both can cause yellowing as they feed on the plant. Spider mites leave fine webbing on the undersides of leaves; mealybugs look like small white cottony clusters in the leaf joints. Both respond well to neem oil spray applied consistently for two to three weeks.

    The Quick Austin Pothos Diagnostic

    1. Stick your finger 2 inches in the soil — wet? Stop watering for 2 weeks
    2. Look at where the yellow is — between the veins? Mineral buildup — flush with distilled water
    3. Check for patches on sun-facing leaves — direct sun scorch — move or add a sheer curtain
    4. Last fertilized over a year ago? — add liquid fertilizer at half strength
    5. Check leaf undersides for pests — treat with neem oil if found

    Most yellowing pothos respond within 2–4 weeks once you’ve identified and fixed the cause. The plant is resilient — it just needs you to figure out what’s actually wrong rather than guessing.

    If you’ve tried everything and it’s still declining, text me a photo at (512) 829-1467. Plant rescue house calls are one of the services I offer, and I’ve seen a lot of Austin pothos come back from worse than this.

    I run Keep Austin Watered — plant styling and care for homes across Austin, Dripping Springs, Westlake Hills, Lakeway, Steiner Ranch, and the Hill Country. If you’ve got a struggling pothos (or anything else), get in touch.

    Going deeper: Brown Tips on Houseplants in Austin · Repotting Houseplants in Austin

    Frequently Asked Questions

    Need help with struggling Austin plants? Will Burke makes plant rescue house calls across Westlake Hills, Dripping Springs, Steiner Ranch, Tarrytown, and Lakeway. Text a photo to (512) 829-1467 and he’ll tell you what’s wrong.


    Further Reading

  • Plant Styling a Spanish Oaks Home: What a Real Consultation Looks Like

    Plant Styling a Spanish Oaks Home: What a Real Consultation Looks Like

    A few months ago I got a text from a homeowner in Spanish Oaks — the gated community off Highway 71 west of Austin, near Bee Cave — who had just finished a major renovation and wanted plants that could keep up with the space. “We spent a lot on the house,” she said. “I don’t want plants that look like we grabbed them from Home Depot.

    (There’s a real reason for that — big-box store plants die for predictable reasons that most buyers don’t know about.)

    That’s pretty much my favorite kind of client. Not because of the budget — but because they understand that the right plants in the right space make a real difference, and they’re ready to do it properly. This is an account of what that process looked like, from the initial consult through the finished install. Names and identifying details are changed for privacy.

    The Space: What We Were Working With

    Spanish Oaks homes tend to share a few design characteristics that affect plant selection. The lots are generous — typically an acre or more — and the architecture leans toward Texas Hill Country contemporary: warm limestone exteriors, high ceilings, open floor plans, and large windows oriented toward the Hill Country views. That last part is actually critical for indoor plants.

    This particular home had 14-foot ceilings in the main living area, a wall of west-facing windows overlooking a pool and the tree line beyond, and an entry foyer with a dramatic staircase that the homeowner specifically wanted to anchor with something tall and architectural. There was also a home office off the main hall — north-facing, lower light — and a chef’s kitchen that got bright indirect light from east windows in the morning.

    Light assessment is the first thing I do on every consult. Not all bright rooms are the same bright. A west-facing window in Spanish Oaks gets intense afternoon sun from about 2pm until sunset — great for some plants, fatal for others. Understanding that early changes every recommendation that follows.

    The Consultation: What I Actually Look At

    The consult took about 45 minutes. I walked every room with the homeowner, measured light levels (I use a simple lux meter — nothing fancy), looked at the HVAC vents and their proximity to where she was thinking about placing plants, and asked her a few questions:

    • How often do you travel? (This affects watering cadence and whether a plan needs to be self-sustaining or caretaker-supported.)
    • Do you have pets? (Several common dramatic plants — pothos, ZZ plants, peace lilies — are toxic to cats and dogs.)
    • What’s your aesthetic direction? (She said “relaxed luxury, not tropical, not desert cactus — somewhere in the middle.”)
    • What’s worked and what hasn’t? (She’d killed two fiddle leaf figs and a bird of paradise in the previous house, which told me a lot.)

    That last answer was useful. The previous home was in a different light situation — south-facing windows, more filtered light. The bird of paradise that struggled there would likely have thrived in this new west-facing living room. Context matters enormously.

    The Plan: What We Recommended

    Entry Foyer: Dramatic and Low-Maintenance

    The foyer got a 7-foot Ficus Audrey — a cousin of the fiddle leaf fig but dramatically more forgiving. Same large, rich green leaves, similar sculptural form, but Ficus Audrey tolerates Austin’s humidity fluctuations and our hard water far better. Placed on a simple white concrete pedestal to bring it to eye level with the second-floor landing, it reads as intentional and high-end from both floors of the home. Total cost: about $340 for the plant and pedestal sourced together.

    Main Living Area: Layered, Not Cluttered

    The west-facing living room got three plants working at different heights:

    • A large Monstera deliciosa in the corner nearest the window — benefiting from the bright indirect light while being shielded from direct afternoon sun by a sheer linen panel
    • A trailing Pothos ‘Golden’ on the built-in bookshelf at mid-height, which softens the shelving without competing with the books and objects
    • A low Sansevieria ‘Black Gold’ on the coffee table end, which adds a graphic, almost sculptural element at seating level

    The key to making multiple plants in one room work is treating them as a composition rather than individual decisions. Different heights, different leaf textures, one trailing element — it reads as designed rather than collected.

    Home Office: Low Light Done Right

    The north-facing office is the room most people make the biggest mistake in. They either put nothing there (understandable) or they put a plant that slowly dies from light deprivation (frustrating). We went with a ZZ plant — Zamioculcas zamiifolia — which has evolved to thrive in the low-light forest floors of Eastern Africa and is basically indestructible in a dim Austin office. The waxy, dark green leaves look expensive. It grows slowly, which means it stays looking exactly right for a long time. And it goes weeks without water without protest.

    Kitchen: Something That Earns Its Place Near Food

    The bright east-facing kitchen window got a potted Meyer Lemon tree — a fruit-bearing citrus that loves exactly the morning light an east Austin window provides, smells incredible when it blooms (which it does repeatedly indoors), and produces actual lemons you can cook with. It’s the kind of plant that makes a kitchen feel genuinely lived-in and intentional. It needs slightly more care than the others — consistent watering and occasional fertilizing — but for a kitchen where someone is clearly cooking seriously, it’s the right call.

    The Install: What “Done Right” Looks Like

    Installation took about two hours. I delivered the plants in my truck, brought them in one at a time, adjusted placement in real-time based on how they looked in the actual light (photos and plans only go so far), and repotted the Ficus Audrey into a planter that matched the home’s material palette — warm travertine, consistent with the tile throughout the house.

    I also left a simple one-page care card for each plant: watering frequency by season, whether to mist or not, what to watch for. Most of my clients don’t want to become plant experts — they just want to know the minimum they need to do to keep things looking right. A simple card is usually enough.

    What This Looks Like Three Months Later

    I check in on this client monthly as part of her ongoing care plan. The Monstera has put out six new leaves since the install. The Ficus Audrey is stable and not dropping leaves, which is honestly the gold standard for that plant. The Meyer Lemon produced one small crop of lemons — she mentioned making limoncello, which I appreciated. The ZZ plant in the office looks exactly the same as the day it went in, which is ideal.

    The most common thing I hear at the first monthly check-in is some version of: “I can’t believe I waited this long to do this.” The right plants in the right space change how a home feels. Spanish Oaks homes already have a lot going for them architecturally — the plants just make the most of that.

    Thinking About Plants for Your Spanish Oaks or Bee Cave Home?

    I serve Spanish Oaks, Bee Cave, Lakeway, and the broader Lake Travis corridor (including real estate stagers preparing listings). The consult is free — I come to your space, assess your light, and tell you honestly what will work. No pressure to commit to anything. Here’s how the process works, or you can text me directly at (512) 829-1467.

  • Fiddle Leaf Fig Alternatives for Austin: 3 Plants That Actually Thrive Here

    Fiddle Leaf Fig Alternatives for Austin: 3 Plants That Actually Thrive Here

    Every few months someone texts me a photo of a drooping, brown-spotted fiddle leaf fig and asks if I can save it. My answer is usually the same: I can try, but Austin is genuinely one of the hardest cities in the country to keep these plants alive. And I want to explain exactly why — because once you understand what’s happening, you’ll either stop blaming yourself or finally switch to something that works.

    First, try to save the one you have: Fiddle Leaf Fig Care in Austin (And Why Yours Keeps Dying) — the troubleshooting guide for the 5 most common Austin-specific problems. If you’ve already decided to switch, read on.

    Why Austin Is the Worst Place for Fiddle Leaf Figs

    The fiddle leaf fig (Ficus lyrata) is native to the tropical rainforests of West Africa — specifically the lowland jungles where humidity sits around 80%, temperatures barely fluctuate, and the light is filtered and consistent. Austin is basically the opposite of all of that.

    Problem 1: Our AC Air Is Actively Hostile to Them

    Central Texas AC runs hard from April through October, sometimes November. That means 6+ months of air that’s being aggressively dehumidified and circulated. Fiddle leaf figs need humidity above 50% to thrive. Most Austin homes with AC running hover between 30–45%. The leaves crisp at the edges, then brown, then drop. Placing a humidifier next to the plant helps but it becomes a maintenance job — you’re essentially fighting your own home’s HVAC system.

    Problem 2: Our Windows Are Too Intense

    Austin gets about 300 sunny days per year. South-facing windows — which most people assume are perfect for a tropical plant — pour direct, harsh light that scorches fiddle leaf fig leaves in the afternoon. West-facing windows are even worse. The plant wants bright indirect light, which is actually quite hard to achieve naturally in a Texas home without sheer curtains doing a lot of heavy lifting.

    Problem 3: They Hate Being Moved

    Fiddle leaf figs are famously reactive to any change in environment. Moving them from a nursery in Houston, to a car, to your living room — each transition triggers shock. They drop leaves. Then you panic and move them toward more light. More leaves drop. This is a plant that needs months of total stillness to settle, and most Austin homes shift dramatically between hot seasons and AC seasons, which the plant registers as constant environmental disruption.

    Problem 4: Austin Water

    Our tap water is hard — around 290 mg/L from the Highland Lakes (and even harder for Dripping Springs customers on the Trinity Aquifer). That’s mostly calcium and magnesium. Fiddle leaf figs are sensitive to mineral buildup in the soil, which manifests as brown leaf tips and root stress over time. You can filter your water, use rainwater, or flush the soil regularly, but it’s another maintenance burden that most people don’t realize they’re signing up for.

    3 Plants That Give You the Drama Without the Drama

    Here’s the thing: the visual appeal of a fiddle leaf fig is the large, architectural leaves and the tall, sculptural form. You absolutely can get that in an Austin home — just with plants that are actually built for our conditions.

    1. Bird of Paradise (Strelitzia nicolai) — Will’s Top Pick

    The giant white bird of paradise is everything a fiddle leaf fig promises to be, but actually delivers. The leaves are enormous — some spanning 2+ feet — with a gorgeous blue-green color and an inherently sculptural, palm-like form. More importantly, it wants Austin’s bright light. South and west windows that would scorch a fiddle leaf fig are exactly what a bird of paradise thrives in. It handles lower humidity well, tolerates our water reasonably, and — critically — it doesn’t throw a fit when you move it or forget to water it for two weeks. I’ve staged bird of paradise plants in Westlake Hills homes and they regularly stop guests dead in their tracks. Start with a 10″ pot and give it a south window and you’ll see dramatic growth within a season.

    2. Monstera deliciosa

    The split-leaf philodendron is genuinely one of the best plants for Austin homes. It offers bold, architectural foliage with those iconic fenestrations, it grows enthusiastically in our conditions, and it’s forgiving in ways the fiddle leaf never is. Monsteras tolerate indirect light from east or west windows, handle the occasional watering miss, and adapt to our humidity swings without complaint. They also grow fast here — in a good Austin window, you’ll see new leaves unfurling every few weeks in spring and summer. If you want something that looks like a designer chose it for your living room, a large Monstera in a statement pot is one of the highest-impact moves I make in Austin homes.

    3. Olive Tree (Olea europaea) — for the Mediterranean Austin Aesthetic

    Indoor olive trees are having a serious moment in Austin design right now, and for good reason — they feel native to our limestone hills aesthetic, they love our intense light, they’re drought-adapted and therefore forgiving of inconsistent watering, and the silvery-green foliage adds a completely different texture to a space. A 6-foot potted olive near a south window in an Austin home looks completely intentional and elevated. Unlike fiddle leaf figs, olive trees will actually reward Austin’s light rather than recoil from it.

    Want something rarer? Beyond these three picks, I source exotic and hard-to-find varieties you won’t see at Home Depot — variegated Monsteras, fenestrated rubber trees, serrated philodendrons. Exotic doesn’t have to mean difficult; the right unusual plant for your space looks like nothing else and behaves like any other tropical.

    The Honest Bottom Line

    I don’t love telling people to give up on a plant they love. If you have a fiddle leaf fig and you’re committed to making it work, I’m happy to come assess your specific space and tell you honestly whether it’s viable — some Austin homes, particularly those with north-facing light and good humidity control, can actually support them. But if you’ve already tried and failed, please don’t assume you’re a bad plant parent. You’re just fighting Austin’s climate with a plant that didn’t evolve for it.

    The plants above will make your space look exactly as good as you were hoping the fiddle leaf would — and they’ll actually stay alive long enough to do it.

    If you want help picking the right plants for your space — or rescuing one that’s already struggling — I offer free consultations across Austin, Dripping Springs, Westlake Hills, Lakeway, and the Hill Country. Here’s how the service works.

    Frequently Asked Questions

    Will serves plant lovers across Austin and the Hill Country — including Westlake Hills, Tarrytown, Barton Creek, Dripping Springs, and Lakeway. If you need help figuring out what will actually thrive in your space, here’s how it works.


    Further Reading

  • How to Water Houseplants in Austin: The Only Guide Written for Our Conditions

    How to Water Houseplants in Austin: The Only Guide Written for Our Conditions

    Every general houseplant watering guide says “water when the top inch of soil is dry.” In Austin, that advice will get you in trouble. Austin’s aggressive AC dries the top layer of soil much faster than the root zone. The surface feels dry when the bottom half of the pot is still soaking wet. Follow the top-inch rule here and you will overwater almost every plant you own — I see this constantly on house calls.

    The Only Austin Watering Rule You Need

    Push your finger 2 inches into the soil. If it’s moist at that depth, wait. For most tropical plants in Austin, this means watering roughly every 7-14 days in summer and every 14-21 days in winter — but those are starting points, not schedules. Let the soil tell you when, not the calendar.

    How Austin’s Seasons Change Your Watering

    Spring (March–May): Water Normally

    Austin spring is the sweet spot. Temperatures are moderate, AC runs less, humidity is higher, plants are actively growing. This is when tropical plants drink most enthusiastically — maybe every 7-10 days for active growers like Monstera, Pothos, and Philodendron.

    Summer (June–September): The Tricky Season

    Plants are stressed by heat and intense light, so they actually drink less. But the AC creates such dry surface conditions that it feels like they need more water. They usually don’t. This is the season most Austin plant owners overwater. Check soil depth more carefully than any other time. And watch for the AC effect — plants near vents will have dry surfaces but wet root zones because the vent is evaporating surface moisture without the plant drinking it.

    Fall (October–November): Resume Normal

    When Austin’s heat breaks, plants come back to life. Growth resumes, drinking increases. This is also the best time of year to repot or introduce new plants.

    Winter (December–February): Water Least

    Most tropical plants slow to 40-50% of their spring drinking rate. Overwatering in winter causes more root rot than any other season because the soil stays wet much longer. Let soil get genuinely dry — 2-3 inches down — before watering most plants. Snake Plants and ZZ Plants can go 4-6 weeks between waterings in December and January.

    The Austin Hard Water Problem

    Austin tap water runs around 290 mg/L hardness (Dripping Springs Trinity Aquifer water is even harder). Over months, mineral salts build up in potting soil and raise pH, causing nutrient lockout. Signs: white crust on soil surface, yellowing despite fertilizing, brown tips on sensitive plants.

    • Tough plants (Snake Plant, ZZ, Pothos): Tap water is fine. Flush soil every 8-10 weeks.
    • Medium plants (Monstera, Philodendron, Rubber Tree): Mostly fine with periodic flushing. Collect rainwater when you can.
    • Sensitive plants (Calathea, Ferns, Orchids): Use filtered water or collected rainwater. Austin tap will slowly damage these.

    Bottom-Watering: Better for Most Austin Plants

    Bottom-watering — placing a pot in a tray of water and letting soil absorb moisture through drainage holes — solves several Austin-specific problems. It prevents mineral salt surface accumulation, ensures the whole root ball gets watered evenly, and is harder to overdo because the plant only absorbs what it needs. Place in 1-2 inches of water for 20-30 minutes, then remove and let drain completely.

    Stop guessing: how to actually tell when a plant is thirsty

    The finger test is your starting point, but after 25 years I rely on weight as much as touch. Lift the pot right after you water, then lift it again a few days later — a pot that feels light as a feather is dry to the core, while one that still feels heavy is holding plenty. With a little practice you can read a plant’s water level just by tipping it an inch off the shelf. Moisture meters are fine as training wheels, but the mineral salts in Austin soil throw them off within a season, so never trust a meter over your own hands. And watch the plant between waterings: most tropicals give you a subtle signal — a faint softening of the leaves — a day before they truly need a drink, which beats any calendar.

    Overwatered or underwatered? In Austin they look the same

    Here is the trap that catches most people. An overwatered plant and a thirsty plant both droop, and our AC makes it worse by drying the surface while the root zone stays soggy. So someone sees a wilting Monstera, feels dry topsoil, and gives it more water — when the roots are actually drowning. Before you reach for the watering can, get your finger two inches down. Dry that far? It is thirsty. Still damp, with drooping yellow lower leaves and maybe a sour smell from the soil? That is overwatering, and the fix is to back off, not pour on. When in doubt out here, wait a day — underwatering is easy to reverse, but root rot usually is not. If you are already seeing the damage, my guide to brown tips on Austin houseplants walks through telling the causes apart.

    What you water with matters as much as when

    This is the part most Austin guides skip. Our tap water is hard and chloraminated, and on a well in the Hill Country it is harder still — and if your home runs a softener, that softened water is quietly salting your pots. Letting tap water sit out overnight helps a little with chlorine but does nothing for chloramine or minerals. If your plants are fussy, or you are seeing crusty soil and brown tips, switch to filtered, distilled, or collected rainwater and watch them turn around. I go deep on the city-water side in my Austin hard water guide, and on wells and softeners in my Hill Country well water guide.

    How much, and where the water goes

    When you do water, water thoroughly — pour until it runs freely out the drainage holes. That wets the entire root ball and carries built-up salts down and out. A splash that only dampens the top trains roots to stay shallow and lets salts stack up. Just as important: never let a pot sit in a saucer of standing water. In our humidity that is a fast track to root rot — empty the saucer fifteen minutes after watering. And once or twice a year, give every plant a heavy flush in the sink or tub to reset the soil, which matters even more on Austin and Hill Country water.

    Your pot and soil change the whole equation

    Two identical plants can need wildly different watering depending on what they are sitting in. Terracotta breathes and dries fast — forgiving for over-waterers, but thirstier in our summers. Glazed and plastic pots hold moisture far longer, so they are gentler in winter but riskier if you have a heavy hand. A plant in an oversized pot stays wet too long; a root-bound one dries out in a day. If you are constantly fighting the watering on one particular plant, the pot or the soil mix is usually the real culprit — my repotting guide covers fixing it.

    If you’d like Will to come diagnose your specific watering situation — especially if you’ve had persistent problems — that’s exactly what the free consultation covers. Book a free visit →

    Further reading: Austin hard water and your plants · Why houseplants die in Austin · Surviving Austin summer with your plants

    Read next: Brown Tips on Houseplants in Austin · Snake Plant Care in Austin